Stop the Drip: A DIY Guide to Fixing Holes in Your Hot Water Tank

Stop the Drip: A DIY Guide to Fixing Holes in Your Hot Water TankDesign Element | Colorado Bear Heating & Air

When a Hot Water Tank Leak Becomes Your Problem

If you need to repair hole in hot water tank, you should know that most DIY fixes are temporary. Small pinhole leaks can often be patched with waterproof epoxy putty or a pipe repair clamp, but these are only stop-gap measures. A hole usually means internal corrosion has taken hold, signaling the tank is failing and will likely need replacement soon. Before any repair attempt, always turn off the power, gas, and water supply to the unit for safety.

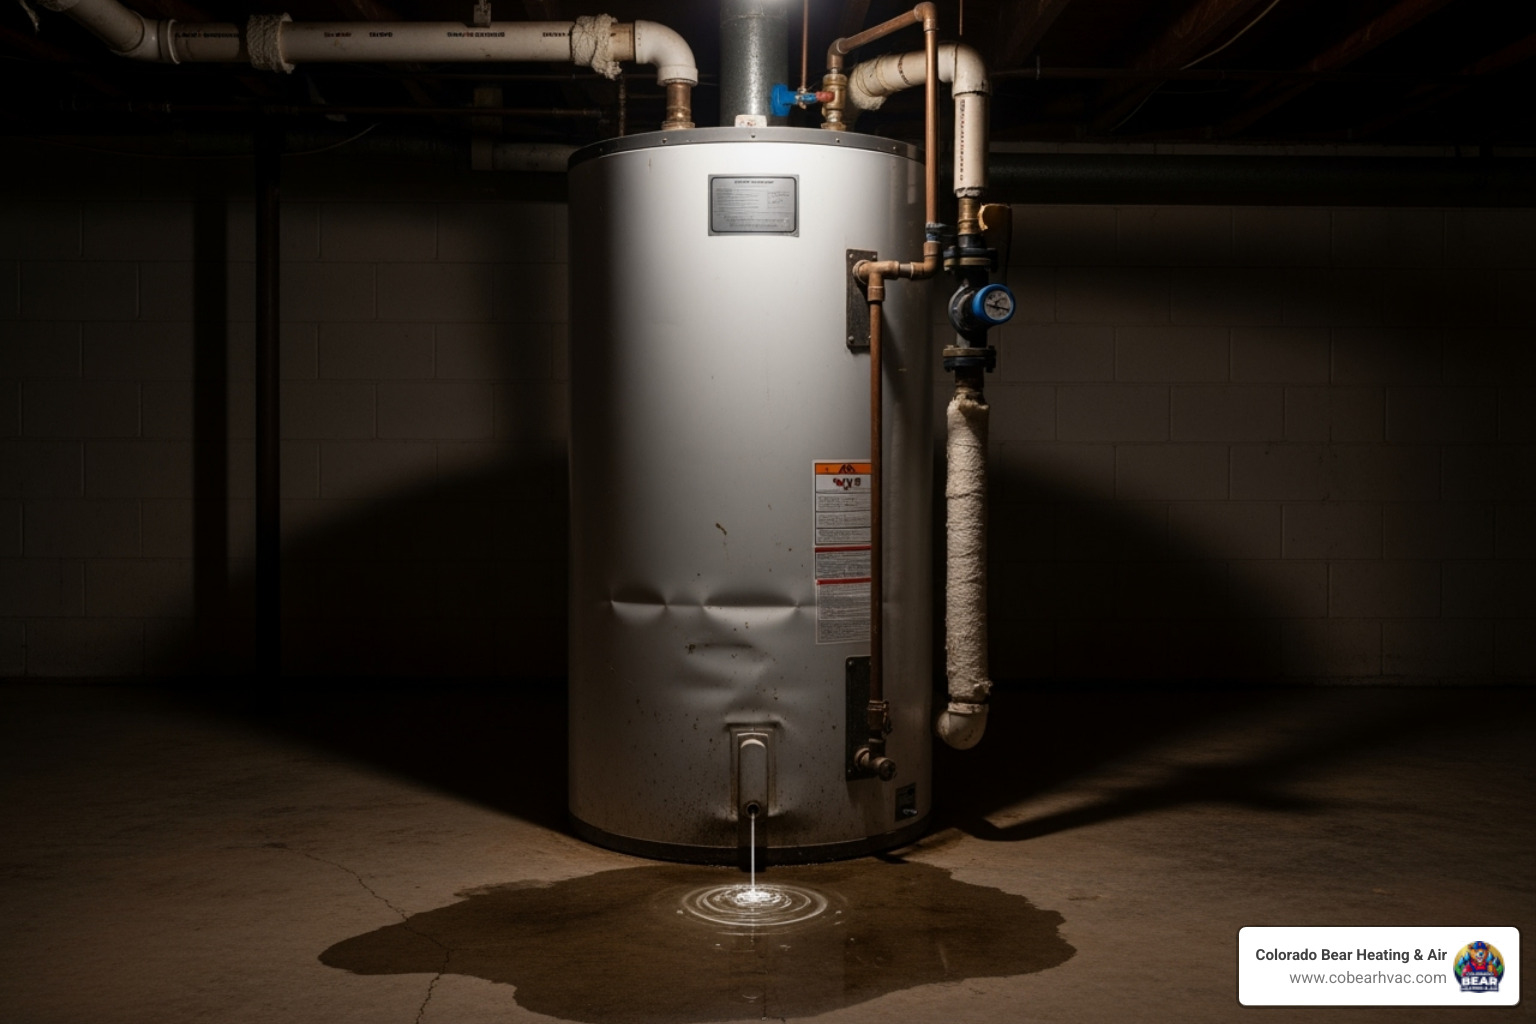
A puddle around your water heater is a clear sign of trouble. For homeowners in Castle Rock, CO, where hot water is essential, a failing tank can cause major disruptions, from cold showers to costly water damage. While a temporary DIY patch can buy you time, it's crucial to understand that it doesn't solve the underlying corrosion. Knowing when to apply a quick fix and when to call a professional is key to protecting your home.

If you're weighing your options, check our guide to Tanked Water Heaters in Castle Rock, CO. For immediate help, our team is ready to assist with Water Heater Repair in Castle Rock, CO.

Infographic showing common signs of a failing water heater including water pooling at the base, rusty or discolored water coming from taps, strange rumbling or popping noises from the tank, visible rust spots or corrosion on the tank exterior, and a tank age over 8-12 years - repair hole in hot water tank infographic

First Steps: Diagnosing the Leak and Staying Safe

Before you can repair hole in hot water tank, you must identify the problem and prioritize safety. Leaks can stem from internal corrosion, sediment buildup, a failed anode rod, or excessive water pressure. Since water heaters involve electricity or gas, taking proper safety precautions is non-negotiable.

person inspecting water heater - repair hole in hot water tank

Signs and Symptoms of a Tank Leak

The most obvious sign is a puddle at the base of the tank. You might also hear dripping or hissing sounds. Other red flags include:

  • Rusty spots or streaks on the tank's exterior.
  • Hot water that appears rusty or has a metallic taste.
  • A sudden increase in your utility bills, as the heater works overtime to replace lost hot water.
  • A musty smell, indicating dampness from a slow leak. This guide on water odor causes can offer more insight.

Common Causes: Why Do Holes Form?

Holes typically form for a few key reasons:

  • Internal Corrosion: The most common culprit. A sacrificial anode rod is designed to corrode instead of the tank. Once it's depleted (usually in 2-5 years), the tank's steel walls begin to rust from the inside out, eventually forming pinholes.
  • Sediment Buildup: Minerals settle at the bottom, creating a layer that traps heat. This causes the tank to overheat, weakening the lining and leading to cracks and leaks.
  • High Water Pressure: Pressure consistently above 80 PSI puts stress on the tank and its components, accelerating wear.
  • Age: Most water heaters last 8-12 years. As they age, internal components naturally degrade, making leaks more likely. Our Maintenance Tips for Long-Lasting Water Heaters can help you extend your unit's life.

Essential Safety Precautions Before You Start

This is not optional—it's critical for protecting yourself and your home. Follow these steps before touching your water heater:

  1. Turn Off Power: For an electric model, flip the corresponding breaker in your panel to "OFF." For a gas model, turn the gas control valve on the unit to "OFF."
  2. Shut Off Gas Supply: For gas heaters, it's wise to also shut off the main gas supply line to the unit, especially if you smell gas.
  3. Turn Off Water: Turn the cold water inlet valve (usually at the top of the tank) clockwise to close it. If there's no dedicated valve, shut off your home's main water supply.
  4. Wear Protective Gear: Put on rubber gloves and safety glasses to protect against hot water and sharp edges.
  5. Ensure Ventilation: Open windows or use a fan to circulate air, especially when working with epoxy or near a gas unit.

Gearing Up: Tools and Tank Preparation

With the unit safely powered down, it's time to gather your supplies and prepare the tank for a temporary fix. Having everything ready makes the job go much smoother.

tools and materials for repair - repair hole in hot water tank

Tools and Materials Checklist

To repair hole in hot water tank, you will need:

  • Waterproof epoxy putty
  • Pipe repair clamp kit
  • Sandpaper or a wire brush
  • Clean rags
  • A bucket
  • A garden hose
  • An adjustable wrench
  • Safety gloves and glasses

Preparing the Tank for Repair

Proper preparation is critical for a successful patch. Do not rush these steps.

  1. Confirm Power and Water are Off: Double-check that you've completed all the safety precautions from the previous section.
  2. Drain the Tank: Attach a garden hose to the drain valve at the bottom of the tank and run the other end to a floor drain or outside. Open the valve. You only need to drain the water to a level below the leak.
  3. Vent the Tank: To help it drain faster, open a hot water faucet somewhere in the house (like a bathroom sink). This breaks the vacuum inside the tank.
  4. Clean the Damaged Area: Once the water level is below the hole, use a wire brush or sandpaper to thoroughly remove all rust, scale, and paint from the area. The surface must be completely clean and dry for the patch to adhere.
  5. Roughen the Surface: Lightly sand the area immediately around the hole. This creates a textured surface that helps the epoxy grip securely.

How to Repair a Hole in a Hot Water Tank: Step-by-Step Methods

Now that the tank is prepped, let's cover the repair. These are temporary fixes designed to buy you time before a professional assessment and likely replacement. They stop the immediate leak but do not solve the underlying corrosion.

hands applying epoxy putty - repair hole in hot water tank

When you need to repair hole in hot water tank, your two main DIY options are epoxy putty for small pinholes or a repair clamp for larger issues.

comparison table of repair methods - repair hole in hot water tank infographic

Step-by-Step: How to Repair a Hole in a Hot Water Tank with Epoxy

Epoxy putty is ideal for tiny pinholes or hairline cracks. It hardens into a strong, waterproof seal.

  1. Knead the Putty: Cut off a small piece and knead it until the colors blend into a uniform shade. It will become warm as the chemical reaction begins.
  2. Apply Firmly: Immediately press the mixed putty firmly over and into the clean, dry hole. Spread it slightly around the edges to create a strong bond with the tank's surface.
  3. Shape and Smooth: Use your fingers to create a smooth, even layer that completely covers the leak.
  4. Allow to Cure: This is crucial. Check the manufacturer's instructions for the full curing time, which can be up to 24 hours. Do not rush this step; a full cure is necessary for a durable patch.

Applying a Pipe Repair Clamp

A pipe repair clamp is a more robust temporary fix for larger holes or leaks near fittings.

  1. Position the Gasket: Center the rubber gasket from the kit directly over the hole, ensuring it provides complete coverage.
  2. Place the Clamp: Wrap the two metal halves of the clamp around the tank or fitting, holding the gasket in place.
  3. Tighten Evenly: Tighten the screws in an alternating pattern, a few turns at a time on each side. This ensures even pressure. Do not overtighten, as this can damage the tank or strip the screws. Tighten until snug and the leak stops.

Testing Your Repair

Properly testing the patch is as important as the repair itself.

  1. Slowly Refill the Tank: Gradually turn the cold water supply valve back on. Listen for any hissing or spraying sounds.
  2. Check for Leaks: Once the tank is full (water will flow steadily from the open hot water faucet), close the faucet. Carefully inspect the patched area with a flashlight for any drips or moisture. If you find any, you must drain the tank and re-do the repair.
  3. Restore Power: Only after you've confirmed the patch is holding should you restore power or gas to the water heater.
  4. Monitor for 24 Hours: Check the repair periodically over the next day. Temperature changes can cause the metal to expand and contract, which may reveal a weak seal. A patch that holds for 24 hours is likely to give you some time to plan your next steps.

The Big Decision: Repair or Replace?

You've managed a temporary fix, buying yourself some time. Now you face a crucial decision: attempt a more permanent repair or invest in a full replacement? This is where our expertise at Colorado Bear Heating & Air helps homeowners in Castle Rock, CO make the right choice.

new tanked water heater being installed - repair hole in hot water tank

Temporary vs. Permanent: When to Repair a Hole in a Hot Water Tank

An epoxy or clamp fix is a stop-gap measure, not a permanent solution. The patch may last for days or months, but the internal corrosion continues to worsen. A temporary repair hole in hot water tank only makes sense if:

  • The leak is a single, small pinhole on a newer tank (under 5-7 years old).
  • Budget constraints prevent immediate replacement.
  • You are waiting for a pre-ordered replacement unit to arrive.

In most cases, a hole in the tank means its operational life is over.

Signs You Need a Full Water Heater Replacement in Castle Rock, CO

Knowing when to replace your unit is key to avoiding a catastrophic failure. It's time for a new tank if you notice these signs:

  • Age: The tank is over 8-12 years old. Repairing an old unit is often not cost-effective.
  • Widespread Corrosion: You see extensive rust on the tank's exterior, or your hot water is discolored. This indicates the internal lining has failed.
  • Multiple Leaks: Patching one leak only to have another appear is a sign of systemic failure.
  • Leaking from Seams: Leaks from the seams at the top or bottom of the tank cannot be reliably repaired and signal critical failure.
  • High Repair Cost: If a professional repair costs a significant fraction of a new unit, replacement is the smarter long-term investment.

If you see these signs, contact us for a professional assessment. Learn more about our Water Heater Replacement in Castle Rock, CO services.

How Regular Maintenance Prevents Future Leaks

Prevention is the best strategy. Regular maintenance can dramatically extend your water heater's lifespan.

  • Annual Tank Flushing: Draining the tank once a year removes sediment buildup, preventing overheating and corrosion.
  • Anode Rod Inspection: Have the sacrificial anode rod checked every few years and replaced when depleted to protect the tank from rust.
  • Check the T&P Valve: Test the temperature and pressure relief valve annually to ensure it functions correctly and can prevent dangerous pressure buildup.
  • Manage Water Pressure: High water pressure (above 80 PSI) strains the tank. Installing a pressure-reducing valve can prevent premature wear.

For comprehensive care, explore our services for Tanked Water Heaters in Castle Rock, CO. Regular maintenance prevents problems before they start.

Frequently Asked Questions about Water Heater Leaks

Here are answers to the most common questions we hear from homeowners about water heater leaks.

How long will a temporary patch on a water heater last?

A temporary repair hole in hot water tank with epoxy or a clamp is unpredictable; it could last days or months. It depends on the severity of the corrosion, the size of the hole, and your water pressure. It is not a permanent solution. The patch will eventually fail because the underlying corrosion inside the tank continues to worsen. Use this time to schedule a professional assessment.

Is it dangerous to use a water heater that has a small leak?

Yes, it is dangerous. A small leak indicates significant internal corrosion and a risk of the tank bursting, which could cause major flooding and water damage. For electric heaters, a leak creates a severe shock hazard. For gas heaters, it can damage the burner assembly and lead to a gas leak or fire. You should immediately turn off the power (or gas) and water supply to a leaking tank.

What is the most common cause of a hole in a water tank?

The most common cause is internal corrosion. Water heaters have a sacrificial "anode rod" that is designed to corrode instead of the steel tank. Once this rod is depleted (typically in 2-5 years), corrosive elements in the water begin to eat away at the tank's lining, eventually creating pinholes. Sediment buildup at the bottom of the tank can accelerate this process by trapping heat and corrosive agents against the tank wall.

Conclusion

Knowing how to apply a temporary patch can be a lifesaver, protecting your home from immediate water damage. However, a DIY repair hole in hot water tank is a temporary fix, not a permanent solution. The internal corrosion that caused the leak is still active and will lead to another failure.

Safety must always be your top priority. Before attempting any work, shut off the power, gas, and water supply to the unit. If your tank is over eight years old, shows widespread rust, or has had multiple leaks, it's time to consider a replacement rather than another patch.

At Colorado Bear Heating & Air, we have over 20 years of experience helping homeowners in Castle Rock, CO, and the Denver Metro Area. Our team can accurately diagnose the problem and provide an honest recommendation on whether to repair or replace your unit. We prioritize your safety and comfort with transparent pricing and a customer-first approach.

Don't wait for a small leak to become a major flood. Reach out to us for professional Water Heater Repair in Castle Rock, CO, and let us restore your peace of mind.

Synchrony Logo | Colorado Bear Heating & Air

Apply now for flexible payment options

Get a decision in seconds with no impact to your credit score.

A silhouette of a forest with a dark blue treeline against a black background. The top half of the image is completely black.
A Man holding a mobile phoneA person holding a cell phone with a congratulations message on the screen.

Testimonials

Colorado Bear HVAC is truly the best contractors I have experienced since I moved into my house 30 years ago.  I have been dealing with Joe and his crew for over 11 years now. They are a trustworthy, respectful, experienced crew who works with you and gives you a fair value.  They just completed a big job replacing my A/C, gas furnace and condenser.  They did an excellent job, no short cuts, made sure everything was functional, and cleaned up the area nicely before they left.  No pressure to perform unnecessary service.  You know when the job is done, you have received top notch professional service at a fair price.

Image of smiling man with a hat
Design Element | Colorado Bear Heating & Air
Shawn N.

I used Colorado Bear Heating and Air to replace two furnaces in my home. Nate was exceptional to work with. His team did a great job educating me along the way. He provided competitive pricing with 10 year warranties. They installed quickly and were just super great to work with. I’d highly recommend them.

Our Team Member at Colorado Bear Heating & Air
Design Element | Colorado Bear Heating & Air
Kelly W.

Nate and Sam have been great to work with getting my home humidifier installed in a difficult space in my 1940s house. Their prices were very fair and I would heartily recommend Colorado Bear to anyone looking for a solid HVAC company.

Our Team Member at Colorado Bear Heating & Air
Design Element | Colorado Bear Heating & Air
Dave C.

Thank you Nate for the promptness you guys gave my parent. They are 93 and can't get around and always getting cold, and I was at work called Nate and he had one of his guys there in like 2 hours which was outstanding my dad was very impressed with the professional and how quick he had it fixed.  These guys are great all my family said we found us a new heating and ac company. Colorado Bear Heating & Air you have customers for life!!!!  Thank You Again
Carla and the Barnes Family

Our Team Member at Colorado Bear Heating & Air
Design Element | Colorado Bear Heating & Air
Carla B.

Colorado Bear Heating & Air saved the day! This morning my family and I woke up to frigid outside temperatures(1 degree F)…and no heat! Nate was great over the phone to help me check our furnace, then he sent Sam over to help get us back to warmer temps. They were so quick and helpful. Fortunately I did not have to keep my toddlers inside the house wearing snow suits all day. We are warm now, and so thankful!

Our Team Member at Colorado Bear Heating & Air
Design Element | Colorado Bear Heating & Air
Meghan A.
Design Element | Colorado Bear Heating & Air